Hello everyone! It’s been quite some time since I’ve posted anything here. It has mostly been due to my incredibly tough schedule. I have yet to update the previous post about configuring a basic AA service on Unity Connection. I have the material ready in my head, but I wanted to get my hands on some screenshots to explain the process better. Basically, it will happen whenever I am able to gather all the screenshots.
Moving on to the topic of interest, this article will focus on provisioning support on Cisco Unified Communications Manager (CUCM) for IP phones that are not natively supported on your production system. In my example, I am trying to provide support for 7841 IP phones on CUCM version 8.6.2.
There are a several ways of finding out if your version of CUCM has built-in support for the phone model you would like to register. The easiest way to find out is to log into the web interface and navigate to Device -> Phones. Once on this page, click on “Add New”, which will take us to the page where we would normally add a new phone. Under the device type drop down menu, if the phone model does not exist, it means that the phone is not currently supported and a “device pack” will need to be installed on CUCM.
To successfully register an IP phone with CUCM, we will need to install a “device pack”. I am not certain if all device packs contain the firmware files, so I have included options to download and install these as well. This information can be verified by going through the release notes for the relevant release notes. Both the device pack and reloease notes can be downloaded through Cisco’s website under the Support -> Downloads section. (Note: A CCO ID with a valid service contract is required to obtain these files). To find out the what files need to be downloaded, we will need to first refer to the ‘Release Notes’ for the IP Phone model to find out the name of the device pack file. For the firmware files, we will need to download the file for the IP phone we are looking to support. Also, please ensure that this file is particular to the CUCM version you are running.
The screenshots below show the page where these files can be downloaded for our example upgrade:
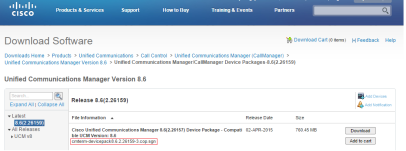
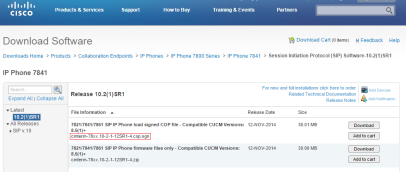
The page above displays the device pack file for our example. The image below shows the firmware files for the phones and CUCM version we are using in our example, that is, 7841.
Before we begin uploading these files, I recommend taking a system backup through DRS and a VM snapshot if the server is running on a virtualized platform. Also, this process should be performed during a scheduled maintenance window.
Warning: I do not take responsibility for any system failure that may result from the procedures outlined in this document. This document is solely intended to provide general guidance to the reader, and it is the responsibility of the person performing this task, to ensure that all information particular to the upgrade is compatible with the production system. This includes for example, the correct CUCM version (Major and minor), IP phone firmware files, device pack file, and any other relevant system information.
Once the backup is complete, we will need to log in through the OS Administration portal and navigate to Software Upgrades -> TFTP File Management, as shown in the screenshot below.

Once on this page, click on the “Upload File” button, browse to the firmware files and upload
Here, we will upload the IP Phone firmware files to the TFTP server. (Note: These files will need to be uploaded separately to all TFTP servers in the cluster).
Once the TFTP files have been uploaded, we will need to apply the device pack file by navigating through the OS administration page, as follows: Software Upgrades -> Install/Upgrade. On this next page, we have the option to either install the device pack through a DVD/CD, or via the network. The network option is labeled “Remote destination”, which is what I have selected for our example. The screenshot below provides an example of how the necessary fields need to be filled out:

We have the choice to upload these files via FTP or SFTP. Free SFTP/FTP utilities are easily available for download on the internet. Before we proceed, I would like to mention that I had some trouble uploading the device pack from the root folder. Like any modern-age techie, I turned to the helpful technical forms on the internet and found that we will need to create another folder inside the root FTP/SFTP folder (give it any name) and place this file inside the new folder. Strangely, that seemed to work for me as well, so I thought it would be worth mentioning.
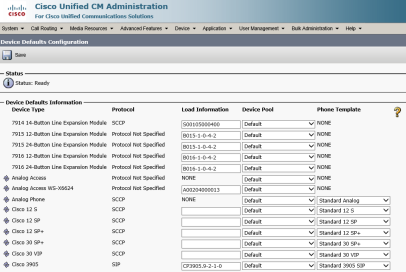
Before we proceed, I would like to add a word of caution; once the file has successfully completed, if the device pack contains the firmware files, it will most likely contain the firmware files for all other phones too. In addition, the “device defaults” page will be updated with the new firmware file names of all the IP phones. This means that for any new phone being added to the system, or an existing phones that are rebooted or restarted, will look for the new firmware files on the TFTP server. Use the following path to navigate to the device defaults page under CM administration: Device -> Device Settings -> Device Defaults
The device default page is shown in the image below:
If these firmware files are not present (they have to be uploaded separately, as mentioned earlier in this post), the upgrade process will fail and the phone will boot up normally using the existing firmware file stored in its storage. In a production environment, this could wreak havoc, so my suggestion would be to read through the device pack release notes and ensure if the firmware files for all phones are present inside the device pack.
If the firmware files are present in the device pack, we will have to upgrade the firmware files for all the IP phone models. However, this may not necessarily be a practical option in every scenario in which case, we will have to ensure that the firwmare filenames for all other IP phones that should not be affected by the upgrades, remain the same.
Unfortunately, there is no way at this time to retain the names, therefore, we will have to let the upgrade change the filesnames to the newer version, then go back to the device defaults page and reenter the old firmware file names from before running the upgrade. We could either take a screenshot of the device default page(s), or copy-paste the information on this page into a spreadsheet. I have not tried the latter and it may not work.
Once we hit the “Next” button, we may will be asked to ensure that the correct filename has been selected for upgrade. Clicking “Next” again may take us to a page where we are asked to ensure that the “MD5 hash authentication value” is correct for the file being uploaded. This can be verified by looking up the value in the release notes for the device pack. Proceeding to the next page will begin the installation.
Once the installation is complete we will need to perform a cluster-wide reboot, which can be done one server at a time. Again, I would advise caution when performing reboot of the servers because if the phones failover to a server that contains the newer firmware filenames, the phones will begin downloading the new files.
Once the servers have been restarted, the new IP phone model support will be available for registering with CUCM. I hope this article has been helpful to the reader. Please feel free to provide your feedback.
Filed under: CUCM, Technical, 7841, Callmanager, Cisco IP Phone 7841, Cisco Unified Communications Manager, CUCM, device pack, devpack, firmware, phone support, sip


